Goopy Papier Mache
Papier Mache - What a concept! Read while you have fun using your reading substance for art!
INGREDIENTS: water, Poly stick fast wallpaper paste
INSTRUCTIONS: mix water and Poly stick fast wallpaper paste together. Le voila! Amazingly simple!
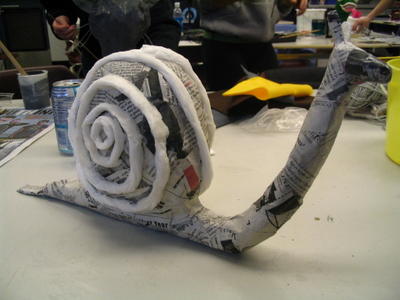
When given a choice as to what creature I could bring alive, I was instantly drawn to a slide we had seen of a papier mache snail. I have always been fascinated by these bizarre insects. As a child I would collect as many as I could from the garden and race them across our family picnic table. My mom had no complaints. I was ridding the yard of a pest, and I was wasting hours of my time watching snails crawl across a long surface.

I decided to do my papier mache snail in two parts: the shell and the body. The body consists of a coat hanger folded in two to allow for more durability. In hindsight I would have shaped the coat hanger into more of an 'S' shape to allow for the snail to be more sturdy. The shell consisted of wrapping numerous amounts of newspapers into a flat ball and taped tight. I then papier mached individually both segments and then placed the shell on top of the body. To 'glue' the shell to the body I placed strips of papier mache between the segments. In order to give the snail's shell some life I used toilet paper to place a spiral ring around the shell.
Once again my FAME classmates have created amazingly creative pieces of art:
Chris has created a puppet head. What really got me interested in his design was his fantastic use of colours. He used one colour (blue) to paint his whole head. He then added bit of black to the blue to darken the shaded areas. Using his original base colour he added white to lighten the areas on top. It's hard not to get caught in this creature's eerie gaze (I'm referring to the puppet head!).

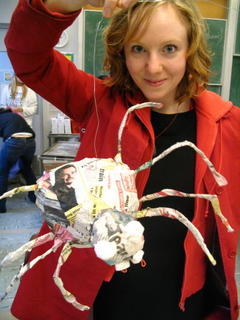
Courtney made a lively spider. Everytime that I look at it I feel like it's going to jump off the table and start tap dancing. It's a great Halloween decoration and when it's painted black it will creep any kid out!

Unfortunately, the creator of this amphibian (Mike) did not want to be photographed, but Amber shows how realistic a papier mache creature can be!

In order to make her beautiful butterfly fly away Nancy used tissue paper dipped in (????GLUE LIKE SUBSTANCE??? what is this called??) and then layered it over the wire frame wings. Really cool!

Steve demonstrates in his Salmon papier mache how simplicity can lead to an amazing piece of art. Steve created his Salmon by keeping to one shape (oval), and then adding fins.

Stu made a Roald Dahl "B.F.G." puppet. What makes Stu's puppet interesting is the fact that she sewed and glued his body together as pieces of clothing.

Lynn and Jen made green creature hermit like puppets. It was interesting to watch their puppets develop as they sat next to each other in class for their puppets began to share many commonalities with each other.


Kav made an awesome Miss Piggy. I really enjoyed the fact that she used yellow yarn to make the pig's hair.

Greg was very proud of his Saturn display. His rocking planet demonstrates how we can use art in almost any subject to teach a topic. How cool would it have been to have had a display of planets made by the students out of of papier mache in one's classroom?

This photo demonstrates how papier mache can be used to make very large puppets. This papier mache head was in the back of the classroom, but it is a little bit larger than a basketball. The artist started off papier macheing a balloon, and then adding on sepearte segments.


1 Comments:
WOW!! Really Very Inspired from Your ideas i love it.
Thank you for post.
Polystick
Post a Comment
<< Home